This article was written in Korean and then translated into English, so there may be inaccuracies.
A Private Certificate is used to enhance security in internal systems or development environments. Since it is issued through self-signing without external certification authorities, it reduces costs and is mainly used for testing, internal networks, and development environments.

How to Generate a Certificate
Installing OpenSSL
If OpenSSL is not installed, it can be installed using the following method.
sudo apt update
sudo apt install openssl
Create Script
Create a ‘create_cert.sh‘ file and write the following content to create the script.
sudo vim create_cert.shModify CA_DOMAIN and TARGET_DOMAIN appropriately to generate the certificates.
- CA_DOMAIN: A virtual certificate authority (CA) used for signing certificates.
- TARGET_DOMAIN: The domain intended for actual use.
#!/bin/bash

# Setting Variables
CA_DOMAIN="icurfer.com"
TARGET_DOMAIN="icurfer.dev"
CERTS_DIR="${HOME}/certs"

# Create Directory
mkdir -p "$CERTS_DIR"
cd "$CERTS_DIR"

# 1. Create CA key (4096 bit)
openssl genrsa -out ca.key 4096

# 2. Create CA cert (10years)
openssl req -x509 -new -nodes -sha512 -days 3650 \
  -subj "/C=KR/ST=Seoul/L=Seoul/O=icurfer/OU=IT/CN=${CA_DOMAIN}" \
  -key ca.key -out ca.crt

# 3. Create Server-key (4096 bit)
openssl genrsa -out ${TARGET_DOMAIN}.key 4096

# 4. Create Server CSR(Certificate Signing Request)
openssl req -sha512 -new \
  -subj "/C=KR/ST=Seoul/L=Seoul/O=icurfer/OU=IT/CN=${TARGET_DOMAIN}" \
  -key ${TARGET_DOMAIN}.key -out ${TARGET_DOMAIN}.csr

# 5. Create x509 v3 extention file (wildcard included.)
cat > v3.ext <<-EOF
authorityKeyIdentifier=keyid,issuer
basicConstraints=CA:FALSE
keyUsage = digitalSignature, nonRepudiation, keyEncipherment, dataEncipherment
extendedKeyUsage = serverAuth
subjectAltName = @alt_names

[alt_names]
DNS.1=${TARGET_DOMAIN}
DNS.2=*.${TARGET_DOMAIN}
EOF

# 6. Create Server Cert (10years, include SAN)
openssl x509 -req -sha512 -days 3650 -extfile v3.ext \
  -CA ca.crt -CAkey ca.key -CAcreateserial \
  -in ${TARGET_DOMAIN}.csr -out ${TARGET_DOMAIN}.crt

# 7. print result
echo "CA cert: ${CERTS_DIR}/ca.crt"
echo "Server key: ${CERTS_DIR}/${TARGET_DOMAIN}.key"
echo "Server CSR: ${CERTS_DIR}/${TARGET_DOMAIN}.csr"
echo "Server cert: ${CERTS_DIR}/${TARGET_DOMAIN}.crt"

echo "Create Success All Certificate"

# 8. rsa convert
openssl pkey -in ${TARGET_DOMAIN}.key -out ${TARGET_DOMAIN}.rsa.key -traditional
Execute the script
Ensure the script has execution permissions. If not, grant the necessary permissions
sudo chmod +x create_cert.shExecute the script by running the following command
./create_cert.shConnection Test
My Chrome Info.

When testing the connection with the Google Chrome browser, you might encounter the following error message
ERR_CERT_AUTHORITY_INVALID
Searching for this message online may provide various solutions, but follow the steps below for guidance

Adding ca.crt to a Trusted Authority Store
Since we created the certificate with a virtual authority, it needs to be added to the client to be trusted.

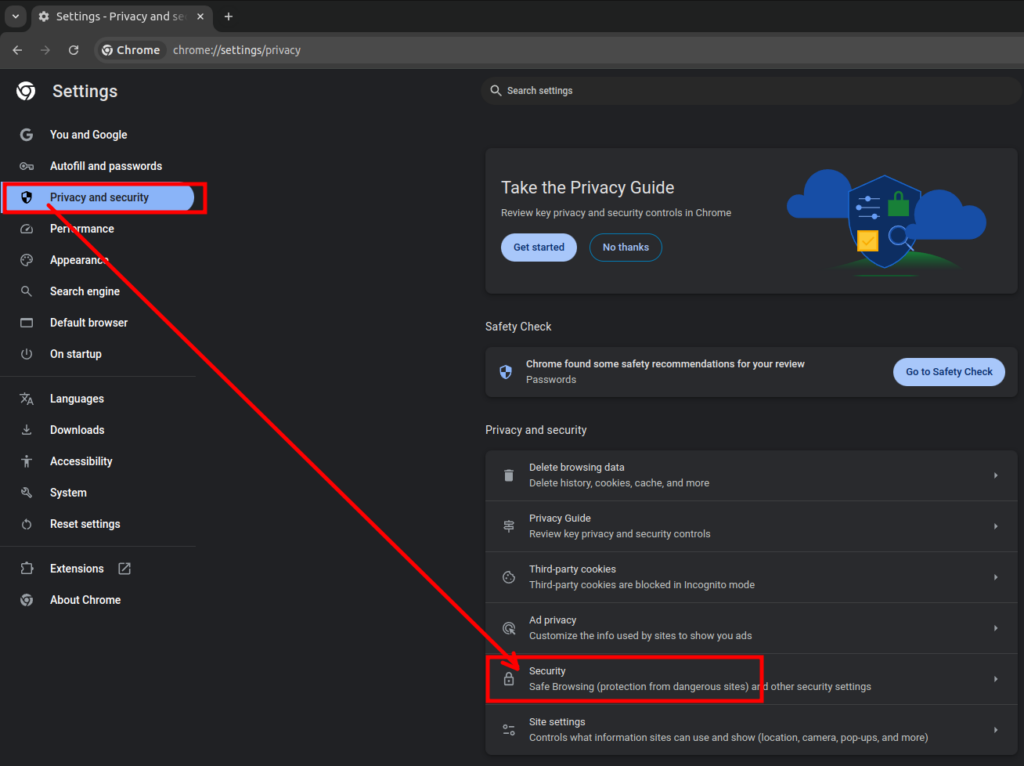
Chrome browser settings
Click the menu button in the top-right corner > Click the Settings button in order.
Privacy and security > Security

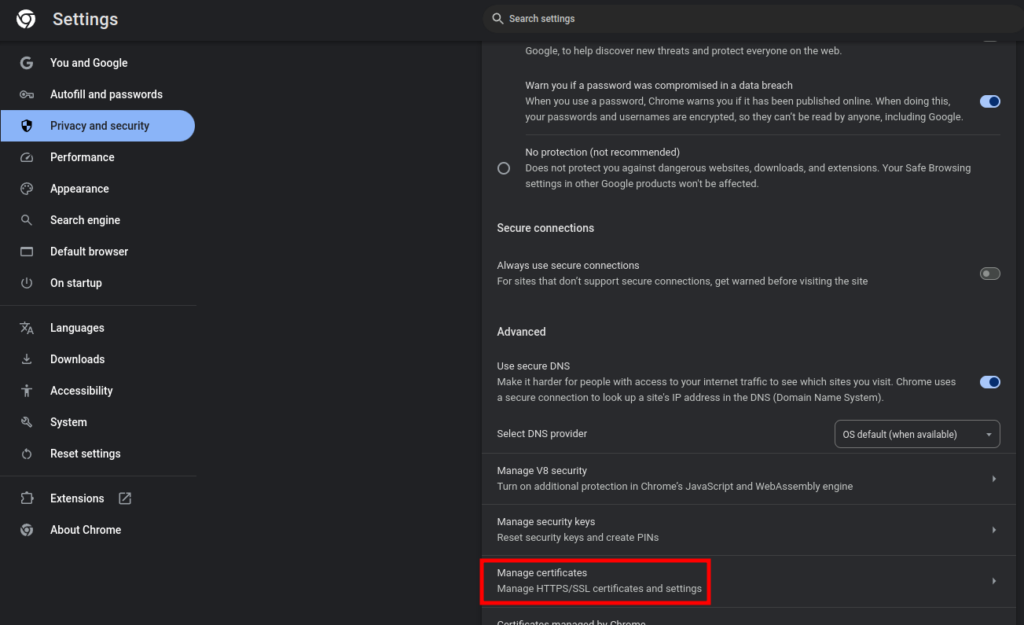
Click Manage certificates

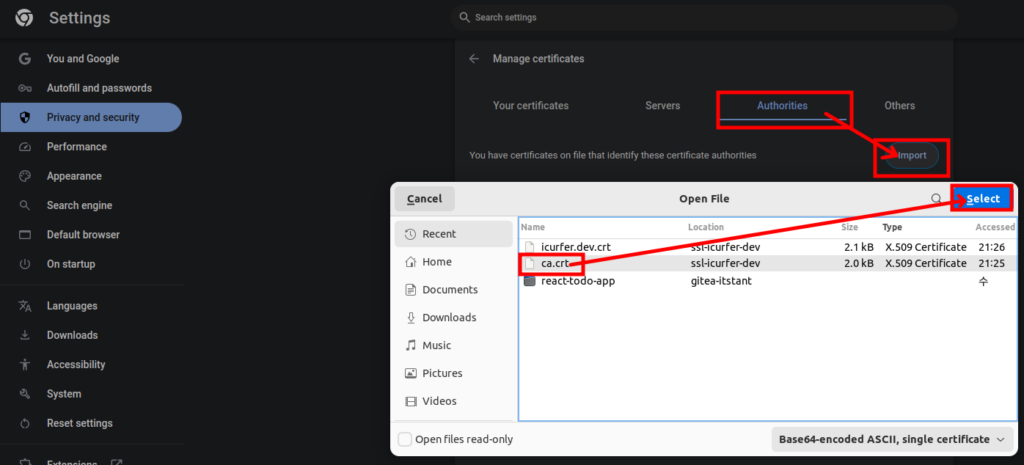
Click Authorities > Import,
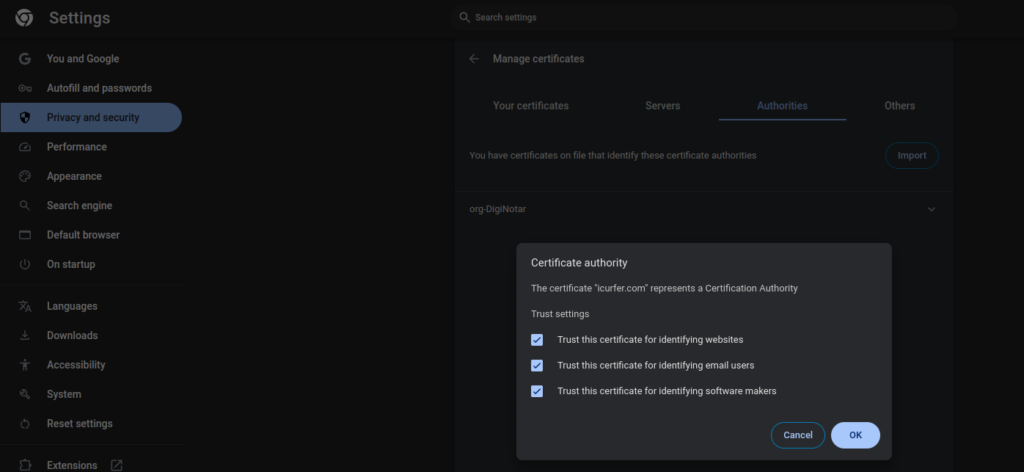
Select the certificate (ca.crt), and click the Select button to register it.


Try accessing the site again.

Ubuntu Terminal Settings
In the Ubuntu terminal, the certificate must be recognized by the server.
(Seeing an engineer struggle to bypass the certificate and connect via IP in a Kubernetes environment was baffling… Please ensure that trusted certificates are registered when using private certificates on servers.)
Copy ca.crt to the /usr/local/share/ca-certificates path.
sudo cp ca.crt /usr/local/share/ca-certificatesApply
root@svr:~# update-ca-certificates
# 아래내용은 적용 결과, 참고
Updating certificates in /etc/ssl/certs...
rehash: warning: skipping ca-certificates.crt,it does not contain exactly one certificate or CRL
1 added, 0 removed; done.
Running hooks in /etc/ca-certificates/update.d...
done.
We have explored how to issue a private certificate using OpenSSL and apply it as a ‘trusted certificate’ on the Chrom Browser. Private certificates are useful for enhancing security in internal networks and development environments, and if trust settings are properly configured, they can be effectively utilized in both testing and production environments.
